4. Network configuration
Quite often you want data to flow between eCAL nodes on different machines. eCAL can run in two modes, that differ from each other: local mode and cloud mode.
| Local mode | Cloud mode |
|---|---|
| - Uses localhost (127.0.0.1) for registration (-> e.g. telling others about new topics and subscribing to topics) | - Uses Multicast (239.0.0.1) for registration |
| - Uses shared memory to send actual data to other processes | - Uses UDP multicast (239.0.0.x) to send data to other hosts. - Uses shared memory to send data to processes on the same host |
4.1 Enable network-mode in ecal.ini
By default, eCAL is configured in local mode. To switch eCAL to cloud mode, edit your ecal.ini and change the following settings:
- Windows:
C:\ProgramData\eCAL\ecal.ini - Ubuntu:
/etc/ecal/ecal.ini
[network] network_enabled = true multicast_ttl = 2The multicast_ttl setting configures the time to live of the UDP datagrams, i.e. the number of hops a datagram can take before it is discarded.
Usually, 2 is sufficient, but if you have a network with many routers, you may have to increase that number.
4.2 Multicast route configuration
Now that you have set eCAL to cloud mode, it will already start sending out UDP Multicast packages for detecting other eCAL Nodes.
Your Operating System however has to send those Multicast packages to a proper network interface controller (NIC).
This is not trivial, as the destination IP 239.0.0.1 does not “really” exist.
Therefore you have to create a route, i.e. a 239.0.0.x -> outgoing NIC mapping.
4.2.1 Multicast configuration on Windows
-
Check the IPv4 address of the ethernet adapter you are using to connect your two PCs. You can do that by typing
ipconfigin a command prompt. You will need the IP of your current machine you are setting the route on. -
Open a command prompt with administrator privileges
-
Enter the following line and replace xx.xx.xx.xx with your IP address
Terminal window route -p add 239.0.0.0 mask 255.255.255.0 xx.xx.xx.xx -
Reboot
-
Check the result from a command prompt. It should show your route under
IPv4 Route Table / Persistent Routes.Terminal window route print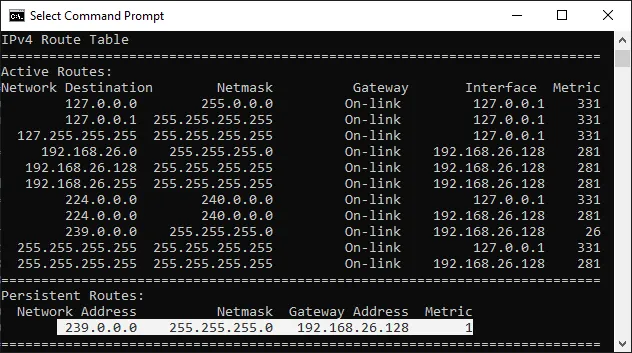
4.2.2 Multicast configuration on Ubuntu
You can configure the multicast route in various ways, depending on your Ubuntu version.
Jump to your section of choice below:
-
Choose how to create routes:
- Via netplan (Recommended for Ubuntu 18 and up. Even integrates into the GUI.)
- Via GUI (Works well for desktop Ubuntu)
- Via /etc/network/interfaces (Legacy, up to Ubuntu 18. Not supported in Ubuntu 20, any more.)
Netplan is used since Ubuntu 18 and should be used in favor of the legacy (but well known) /etc/network/interfaces file. While Ubuntu 18 supports both out of the box, for Ubuntu 20 this is the only file-based networking configuration method.
-
Configure the loopback multicast route (this will become active, if you disconnect from all networks).
Terminal window sudo gedit /etc/netplan/50-ecal-multicast-loopback.yamlPaste the following configuration:
1# eCAL route for loopback (lo)2network:3version: 24ethernets:5lo:6renderer: networkd7routes:8- to: 239.0.0.0/249via: 0.0.0.010metric: 1000 -
Configure the external multicast route. This will get a lower metric and will thus become the preferred route once the interface is up.
Terminal window sudo gedit /etc/netplan/50-ecal-multicast.yamlPaste the following configuration and replace eth0 with your desired interface:
1# Replace eth0 with your network adapter!2network:3version: 24renderer: NetworkManager # GUI integration for desktop Ubuntu5ethernets:67# Replace eth0 with your interface!8eth0:910# Either use DHCP...11dhcp4: yes12dhcp6: yes1314# ... or configure a static address!15#addresses:16# - 192.168.178.42/241718routes:19- to: 239.0.0.0/2420via: 0.0.0.021metric: 1 -
Apply the changes
Terminal window sudo netplan apply
If you have a graphical network manager installed (-> Desktop Ubuntu), you can use it to configure the external route.
-
Configure the external multicast route
- System Settings > Network > Your Adapter > Options > IPv4 Tab > Routes
- Create a route:
- Address:
239.0.0.0 - Netmask:
255.255.255.0 - Gateway:
0.0.0.0 - Metric:
1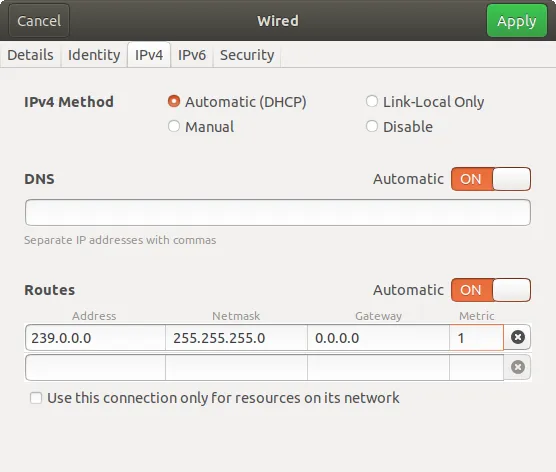
- Address:
-
Turn the interface off and on again
-
Configure the loopback multicast route via netplan or
/etc/network/interfaces. You can omit this, but then you will have to explicitly set eCAL to local mode, if you are not connected to any network.
The well known /etc/network/interfaces file is supported up to Ubuntu 18.
It is not supported since Ubuntu 20, anymore.
Please use netplan instead.
If you are running Ubuntu 18, using netplan is still recommended, unless you want to manage other interfaces via /etc/network/interfaces.
Edit the file and add the content below.
sudo gedit /etc/network/interfaces-
Configure the loopback multicast route (this will become active, if you disconnect from all networks). Add the following lines beneath the
iface lo inet loopbackline:Terminal window post-up ifconfig lo multicastpost-up route add -net 239.0.0.0 netmask 255.255.255.0 dev lo metric 1000 -
Configure the external multicast route. This will get a lower metric and will thus become the preferred route once the interface is up. Add the following lines and replace eth0 with your interface. You may want to replace the dhcp line with your desired configuration.
Terminal window # replace eth0 with your network adapterauto eth0allow-hotplug eth0iface eth0 inet dhcppost-up ifconfig eth0 multicastpost-up route add -net 239.0.0.0 netmask 255.255.255.0 dev eth0 metric 1 -
Restart your PC
4.2.2.1 Test the configuration
Check the result from a terminal. It should show routes for local and external communication:
route -n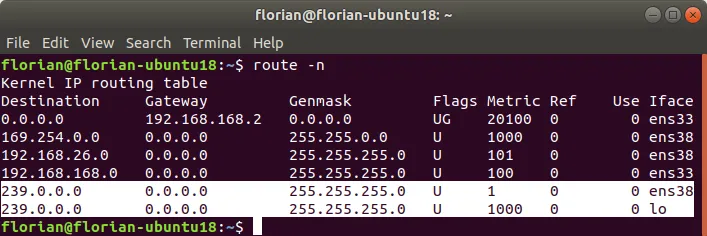
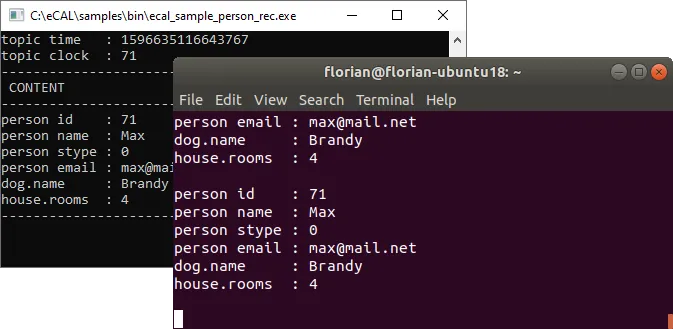
4.3 eCAL Samples over network
Now start one ecal_sample_person_snd and one ecal_sample_person_rec, just as in the previous section. But on different machines! If you configured everything correctly, publisher and subscriber should connect almost immediately and exchange data.