8.2 Hello World with protobuf (Python)
In the last section you learned how to send strings to an eCAL Topic. Using strings is great for simple data that has a textual representation. Quite often however your data will be more complex, so you need some kind of protocol that defines how your data is structured.
Our recommended way is to use Google protobuf to do that, because:
- It solves the problem of how to serialize and de-serialize data for you
- You get downward compatibility out of the box (if you follow the guidelines)
- It is maintained by Google and the API is stable
- The eCAL Monitor can display a nice reflection view of the data
8.2.1 Protobuf in Python
Let’s start with creating the protobuf file. As the sender and receiver need the same .proto files, we place them in a separate directory that will be accessible both for the sender and receiver script.
So, somewhere on your hard drive, create a directory proto_messages with a file hello_world.proto and paste the following content into that file.
Directory
Directoryproto_messages
1syntax = "proto3";2
3package proto_messages;4
5message HelloWorld6{7 string name = 1;8 uint32 id = 2;9 string msg = 3;10}Now you have the description of your message structure.
However, to make it available in python, we need to translate it to a python file.
This is done by the Protobuf Compiler (protoc).
-
On Windows this tool is shipped with eCAL, so if you have eCAL installed, you already got it. If you don’t, please install eCAL.
For running your python script, you don’t need to have eCAL installed, even though it may be beneficial e.g. to use eCAL Mon for introspection of your topics. -
On Ubuntu you can easily obtain it standalone from the apt repository:
Terminal window sudo apt-get install protobuf-compiler
Now convert the .proto file to a .py file on command line.
The command is the same for both Windows and Linux.
cd proto_messages protoc --python_out=. hello_world.protoIf you check the content of the proto_messages directory, you will now find a file hello_world_pb2.py.
This is the file we are going to use in python in the next step.
8.2.2 Protobuf Sender
Now let’s start implementing the actual python code, that sends some protobuf-serialized data to an eCAL topic.
For that, create a file protobuf_snd.py next to your proto_messages directory and paste the following content:
Directory
Directoryproto_messages
- hello_world.proto
- protobuf_snd.py
1import sys2import time3
4import ecal.core.core as ecal_core5from ecal.core.publisher import ProtoPublisher6
7# Import the "hello_world_pb2.py" file that we have just generated from the8# proto_messages directory9import proto_messages.hello_world_pb2 as hello_world_pb210
11if __name__ == "__main__":12  # initialize eCAL API. The name of our Process will be13  # "Python Protobuf Publisher"14  ecal_core.initialize(sys.argv, "Python Protobuf Publisher")15
16  # Create a Protobuf Publisher that publishes on the topic17  # "hello_world_python_protobuf_topic". We also pass it the datatype we are18  # going to send later. By doing this we enable the eCAL Monitor to dynamically19  # show the content of the messages.20  pub = ProtoPublisher("hello_world_python_protobuf_topic"21                      , hello_world_pb2.HelloWorld)22
23  # Create a counter and some messages, so we see something changing in the24  # message, later25  counter = 026  dummy_messages = ["The story so far:"27                  , "In the beginning the Universe was created."28                  , "This has made a lot of people very angry"29                  , "and been widely regarded as a bad move."]30
31  # Infinite loop (using ecal_core.ok() will enable us to gracefully shutdown32  # the process from another application)33  while ecal_core.ok():34    # Create a message and fill it with some data35    protobuf_message = hello_world_pb2.HelloWorld()36    protobuf_message.name = "Douglas Adams"37    protobuf_message.id   = counter38    protobuf_message.msg  = dummy_messages[counter % 4]39
40    print("Sending message {}".format(counter))41
42    # actually send the message to the topic this publisher was created for43    pub.send(protobuf_message)44
45    # Sleep 1s46    time.sleep(1)47
48    counter = counter + 149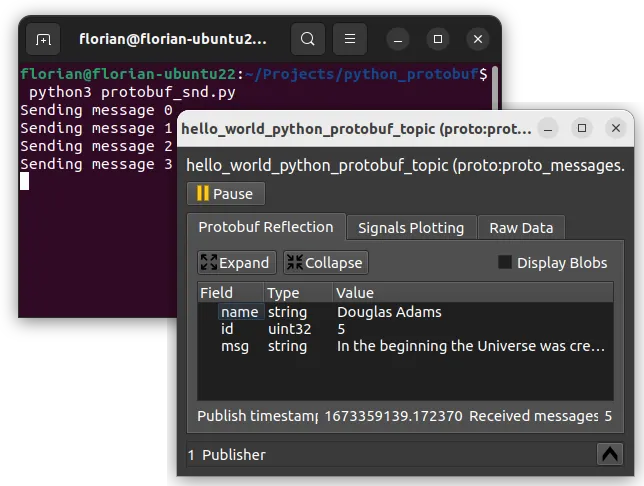
50 # finalize eCAL API51 ecal_core.finalize()When you execute the python script, you can now already see the data in the eCAL Monitor!
8.2.3 Protobuf Receiver
We know that the sender already works. So, let’s implement a python script that can receive the serialized protobuf data, deserialize it and display the content of the message!
Create a file protobuf_rec.py next to the sender and paste the following content:
Directory
Directoryproto_messages
- hello_world.proto
- protobuf_snd.py
- protobuf_rec.py
1import sys2import time3
4import ecal.core.core as ecal_core5from ecal.core.subscriber import ProtoSubscriber6
7# Import the "hello_world_pb2.py" file that we have just generated from the8# proto_messages directory9import proto_messages.hello_world_pb2 as hello_world_pb210
11# Callback for receiving messages12def callback(topic_name, hello_world_proto_msg, time):13  print("Message {} from {}: {}".format(hello_world_proto_msg.id14                                      , hello_world_proto_msg.name15                                      , hello_world_proto_msg.msg))16
17if __name__ == "__main__":18  # initialize eCAL API. The name of our Process will be19  # "Python Protobuf Subscriber"20  ecal_core.initialize(sys.argv, "Python Protobuf Subscriber")21
22  # Create a Protobuf Publisher that publishes on the topic23  # "hello_world_python_protobuf_topic". The second parameter tells eCAL which24  # datatype we are expecting to receive on that topic.25  sub = ProtoSubscriber("hello_world_python_protobuf_topic"26                      , hello_world_pb2.HelloWorld)27
28  # Set the Callback29  sub.set_callback(callback)30
31  # Just don't exit32  while ecal_core.ok():33    time.sleep(0.5)34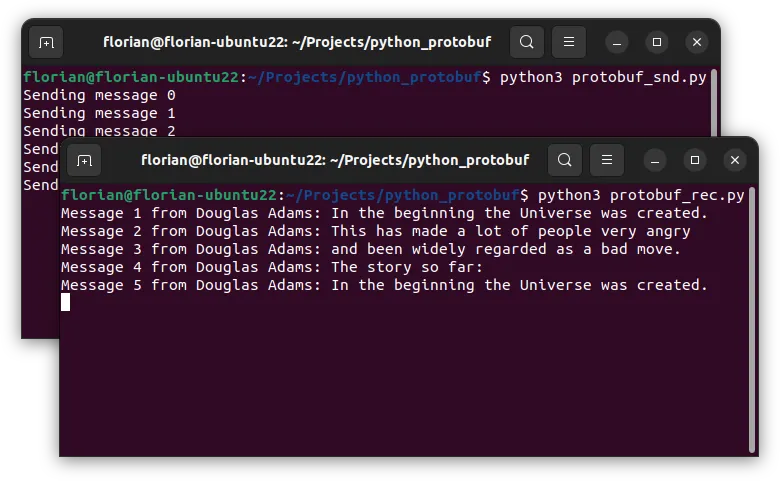
35 # finalize eCAL API36 ecal_core.finalize()Now execute both python scripts to see if they work!
Congratulations, you have completed the Getting Started chapter! Now go ahead and use eCAL in your real-world scenario.
If you experience issues, you can create a GitHub issue, to get help.
8.2.4 Files
Directory
Directoryproto_messages
- protobuf_snd.py
- protobuf_rec.py